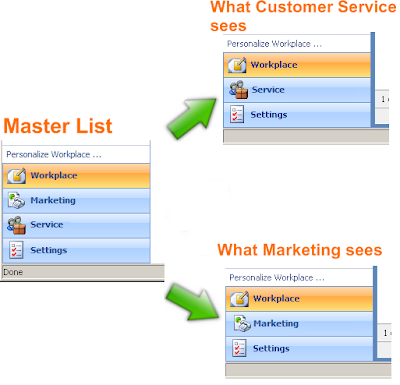
Users of a CRM system can be spread across different departments and organizations. How can you control the navigation tabs on Microsoft CRM 4.0 so that the customer service department and marketing department only see the parts of CRM that they use? While there is no interface within the Settings navigation console to control this, you can hide tabs from groups of users by modifying the sitemap and security roles. If you are unfamiliar with modifying the sitemap, reading Micorsoft Sitemap Reference and article on modifying the CRM Sitemap will be helpful.
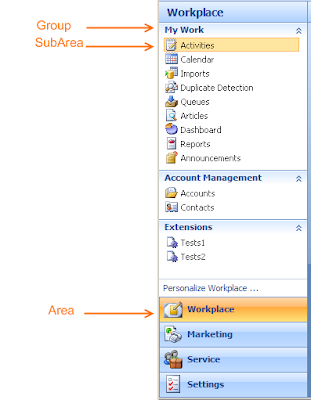
The sitemap is comprised of the xml tags Area, Group and SubArea which show up in the CRM as shown below.
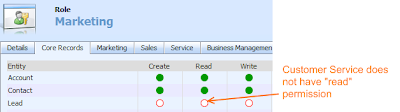
For this example, I’ll go through the steps to hide the “Marketing” tab from customer service users. I’ll pretend that the Marketing tab consists of only the Account, Contact, and Leads entities and customer service does not have “read” access to Leads. You can remove the read access for users in Marketing by creating a security role called Marketing and removing the read permission as shown.
Next we export the sitemap and locate the section that corresponds to the Marketing Area. It looks something like this:
<Area Id="MA" ResourceId="Area_Marketing" Icon="/_imgs/marketing_24x24.gif" DescriptionResourceId="Marketing_Description" Title="Marketing">
   <Group Id="MA">
     <SubArea Id="nav_accts" Entity="account" DescriptionResourceId="Account_SubArea_Description" />
     <SubArea Id="nav_conts" Entity="contact" DescriptionResourceId="Contact_SubArea_Description" />
     <SubArea Id="nav_leads" Entity="lead" DescriptionResourceId="Lead_SubArea_Description" />
   </Group>
 </Area>
We’ll want to split the Lead SubArea into its own group. This is due to the CRM sitemap rule that if a user that does not have privileges to all the SubArea’s within a Group, then the whole Area is hidden from the user. This is accomplished by adding a Privilege tag within our Lead SubArea. Splitting off Lead into a new Group will have no visible impact on the CRM. Newly created Groups that do not have a “Title” attribute will look exactly the same as if they were in the same Group. The modified code that will help us achieve this.
   <Area Id="MA" ResourceId="Area_Marketing" Icon="/_imgs/marketing_24x24.gif" DescriptionResourceId="Marketing_Description" Title="Account Management">
     <Group Id="MA">
       <SubArea Id="nav_accts" Entity="account" DescriptionResourceId="Account_SubArea_Description" />
       <SubArea Id="nav_conts" Entity="contact" DescriptionResourceId="Contact_SubArea_Description" />
     </Group>
     <Group Id="LEAD">
       <SubArea Id="nav_leads" Entity="lead" DescriptionResourceId="Lead_SubArea_Description">
 <Privilege Entity="lead" Privilege="Read" />
       </SubArea>
     </Group>
   </Area>
Before uploading your modified sitemap back to your CRM, make sure you have a copy of the exiting sitemap as a backup in case anything goes wrong. After uploading the new sitemap, you can test it out by using Internet Explorer to impersonate another user. Once you have this simple example working, you can move on to creating entirely new custom tabs for the different departments in your organization.


While CRM 4.0 has a built in feature to email contacts, I've found it a bit less than intuitive for end users. When a user clicks the "Send Email" button in a Contact record, a new CRM form opens up giving them room to type in an email but also presents form fields for the CRM Email Activity. When the user types up the email and clicks send, if you haven't configured an email server for CRM, the email isn't actually sent off immediately. Rather, the user has to wait for their Outlook to sync with the CRM servers and send it out through their own inbox, which can cause some confusion. Some users would prefer to quickly shoot off a quick email using the familiar Outlook interface, without having to copy and paste the Contact's email address. By adding a custom ActionButton, this is a simple addition.
The javascript code below creates an ActionButton which I detailed in a previous post. The code has been modified to add the emailing functionality. I've used the attribute emailaddress1(Email) for this example.
//replace 'emailaddress1' with the name of your custom attribute, make sure you keep the '_d' ending
function loadjscssfile(filename, filetype){
  if (filetype=="js"){
    var fileref=document.createElement('script')
    fileref.setAttribute("type","text/javascript")
    fileref.setAttribute("src", filename)
  }
  else if (filetype=="css"){
    var fileref=document.createElement("link")
    fileref.setAttribute("rel", "stylesheet")
    fileref.setAttribute("type", "text/css")
    fileref.setAttribute("href", filename)
  }
  if (typeof fileref!="undefined")
    document.getElementsByTagName("head")[0].appendChild(fileref)
}
//load some styles to display link image and hovering link image
loadjscssfile("http://" + location.host + "/ISV/styles/openEmail.css", "css")

var linkTD = document.getElementById("emailaddress1_d");
var siteIMG = document.createElement("img");
var siteA = document.createElement("a");

//create img overlay to show "Send Email to Contact" when icon is hovered and store javascript to open link
siteIMG.style.width = "22px";
siteIMG.style.height = "19px";
siteIMG.setAttribute("title", "Send Email to Contact");
siteIMG.setAttribute("alt", "Send Email to Contact");
siteIMG.setAttribute("src", "http://" + location.host + "/ISV/styles/blank.gif");  //1x1 pixel blank overlay image
siteIMG.style.visible = false;

//create img
siteA.setAttribute("href", "mailto:"+crmForm.all.emailaddress1.DataValue);
siteA.style.position = "absolute";
siteA.className = "openEmail";
siteA.style.right = "2px";
siteA.style.top = "4px";
siteA.appendChild(siteIMG);

linkTD.style.position = "relative";
linkTD.appendChild(siteA);
The images and files used in the sample can be found here: Download ZipMake sure to put these files in "C:Program Files\Microsoft Dynamics CRM\CRMWeb\ISV\styles" the ISV folder of your CRM 4.0 on premise install. By default, a 'styles' folder does not exist so please create one.
While this feature might seem trivial, every little bit helps in ensuring a great CRM experience!

Update Rollup 5 was just released on July 2nd and is available for download. As with all Rollup Updates, I'm always curious to read through the list of fixes and see if any affect customizations made to my CRM system. It's always a good idea to test out the Rollup Updates for a few weeks on a development CRM server prior to deploying to production. You'll also want to impersonate a test user account to make sure user accounts with different roles and permissions are not affected.
Of particular interest in this Rollup is a fix for "slow performance and high CPU utilization [which occurs] when you import customizations in Microsoft Dynamics CRM 4.0" 956330. Any time I can cut down page load times is a boon to user experience and satisfaction. After installing the Rollup on my dev CRM system, I found page load times for my Account entity reduced from upwards of 30 seconds from a cleared cache, to less than 5 seconds. Highly recommended!

What's the most efficient way to create a new contact or lead in CRM 4.0 without having to manually enter them in? This is a common problem that all CRM users face. To add to the problem, these leads and contacts can come in a variety of formats including CSV/Excel files, vCards, Emails, or physical business cards. What's an end user to do?
 CSV/Excel:
 Creating new contacts from CSV/Excel files is elegant and simple when you use MS CRM's built in import tool. After cleaning up your data file and ensuring the column headers have been set to CRM attributes, importing a bunch of contacts into CRM takes a matter of seconds. However it's very rare to have a list of contacts come in this clean package, unless you are migrating from a legacy system or importing leads from a lead generation system.
 vCards:
 The electronic business card, otherwise known as the vCard, is a file format which has been around for years. A vCard ends with the vcf extension and can be attached to an email message or included as a link on a web site. Once a user opens up the vcf using Outlook, an Outlook contact record is created, which they can use to push to the CRM system by clicking the "Track in CRM" icon in the CRM Outlook toolbar. In Outlook, you have the option of setting up a vCard and have it attached to all emails you send out. Unfortunately, this adds overhead to every message you send out, since each message will include a vcf attachment and probably won't be too popular with people who are not familiar with vCards.
Emails: For my users, it seems like most new contacts come from email conversations with a company's employees. Typically, an user would then have to create a new contact record before he is able to track any communication from the contact. This involves manually copying and pasting the name and contact information for a contact from the email signature. I came across a very handy Windows program called Anagram, that allows a user to highlight a signature, press F12 and find a new Outlook contact record pre-populated with the contact's details. From here, it would be trivial to push the Outlook contact to the CRM system using the "Track in CRM" button. It seems like Anagram uses a frequently updated, intelligent regular expression to parse out a contact's signature to find what constitutes an address, a phone or fax number, or name and then passes those fields to an Outlook new contact template. From using the trial version of Anagram, I found the program very intuitive and great at what it advertises in accomplishing.
Physical Business Cards: Physical business cards are probably the second most common source of new contacts. To get around the menial typing in of details for each of these type of contacts, you can look into a business card scanner, such as this one made by CardScan. CardScan uses optical character recognition (OCR) technology to scan in a card and then translate them into Outlook contacts. However, at a price point of $149.99 per device, you will really need to consider the utility of the device and the volume of business cards you plan on scanning.
Looking towards the future, a new web movement called microformats adds semantic markup to HTML code, thereby allowing programs to automatically recognize a person's contact information or an address from what the end user perceives as plain text. The hCard microformat is of specific interest, as it uses the vCard spec as a wrapper for a person's contact info. As Outlook is the market leader in global corporate Email use(commanding 48% market share as reported by USA Today) if Microsoft decides to roll along with microformats and integrate it into future versions of Outlook, we could potentially have vCards embedded right into the signature of HTML emails. Then, when these email messages are tracked, using a CRM system, the CRM could automatically create a new contact record either through a workflow or some other mechanism that is abstracted from the end user.
If you've come up with any novel solutions for quickly creating new CRM contacts, please leave a comment!
Continue Entry»
As promised, here is the code for the CRM Reading Pane add-on, albeit a bit later in the week than I would have hoped. For now I've chosen to attach the Visual Studio project as a zip file. Next week I'll look into putting it on a hosted revision control system.
To use the Reading Pane, you will need to open up the Visual Studio solution file and search for all instances of "MODIFY:" These will be areas of the project where you will have to change the code to reflect your own CRM server address, organization name, etc. In addition, you will need to modify your Account entity to create a new tab with an Iframe to host the Reading Pane. The settings for the Iframe are shown below.
Download - Code for Reading Pane


Normally, when reading or searching for a particular CRM Activity, a user has to manually open up Activities one by one in new popup windows. This can turn into a very aggravating experience as system resources must be allocated to open each new window, leading to a delay in rendering each Activity. What if you could read and page through the Activities of an Entity similar to the reading pane in Outlook?
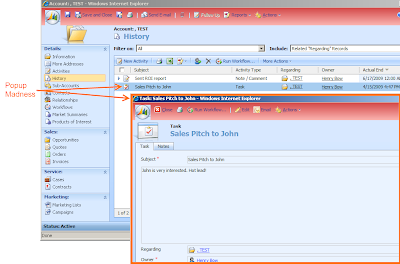
In next week's post I'll show you how to bake a C# ASP.net page, blend in a TSQL query, and sprinkle some javascript spice to treat your users to an enhanced Activity searching and browsing experience. I've deployed this Activity Reading Pane feature to my company with great success! Users have marveled at the newfound ease of searching within the Activities of a particular Account or Contact. See you next week.
Update: Here is the code.
Continue Entry»
Last Friday I deployed a new blogger template. The base template is called Daily Inspired and is created by Antonio Lupetti, author of the popular design blog Woork. This clean looking template provides more functionality than the default template I was using before and aids in readability.
Continue Entry»
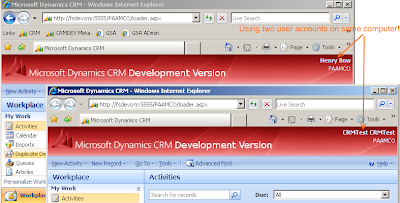
During the course of CRM development, you'll inevitably need to test out security roles and permissions for users. To accomplish this, start off by creating a new Active Directory user explicitly for testing. An Active Directory account is required because Dynamics CRM uses AD to create new users. So, if a user does not exist in AD, a new CRM user account cannot be created for him. Once an AD account has been created, create a new CRM user account for the test user. Assign the roles to the test user that you would like to experiment.
Next, I would normally initiate a new Remote Desktop session to another computer and login as the CRM test user but recently a co-worker introduced me to Window's "Run as..." command.
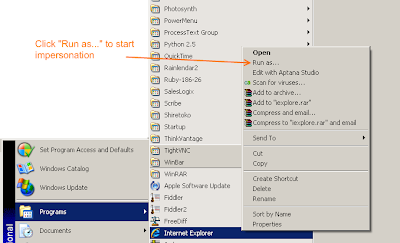
The "Run as..." command allows you to locally run programs using the Active Directory credentials of another user. Impersonating another user on your local computer is a time saver and negates the need to have another computer set up just for testing purposes.

Experimental Feature: This feature is more of a proof of concept and is not ready for production environments.
A good practice of CRM is to keep up to date with news on your customers which can lead to interesting talking points. I thought it would be useful to create a context sensitive Iframe for Leads or Accounts, which would pull in the latest headlines based on the name of a customer. Now, this would only work for bigger, more well known customers, as their names are more likely to show up in the news.
I started off by looking for the RSS feeds of prominent news organizations including Reuters and Bloomberg, hoping to create contextual filters by using Yahoo Pipes. Haplessly, I found out that Bloomberg discontinued their RSS feed some time in late 2006. While looking at the Reuters feed API, I realized pulling RSS feeds from individual sites wasn't enough, what I really needed was a news aggregator. I came across Google News, which turned out to be exactly what I needed. Google News aggregates content from thousands of sources, distills similar articles and gives the ability to sort by article publication date. Checking the Google News documentation revealed that a Google News widget was released in February 2009. I decided to take this widget for a spin.
The code below was modified from the widget sample code to grab the name of an Account as the query parameter.
<!DOCTYPE html PUBLIC "-//W3C//DTD XHTML 1.0 Strict//EN" "http://www.w3.org/TR/xhtml1/DTD/xhtml1-strict.dtd">
<html xmlns="http://www.w3.org/1999/xhtml">
  <head>
    <meta http-equiv="content-type" content="text/html; charset=utf-8"/>
    <title>Google News</title>
<script type="text/javascript" src="http://www.google.com/jsapi"></script>
<script type="text/javascript">
 google.load("elements", "1", {packages : ["newsshow"]});
 var newsTopic = window.parent.crmForm.all.name.value;   //get name of account from parent frame
 function onLoad() {
   // Change the topic to business
   var options = {
     "queryList" : [
       {
  "title" : newsTopic,  //title of news box
  "q" : newsTopic,      //query parameters
  "scoring" : "d",      //order results by date
  "rsz" : "large",      //return large result set (8 entries max)
  "ned" : "us"       //limit results to US
       }
     ],
     "linkTarget" : "_blank"
   }
   var content = document.getElementById('content');
   var newsShow = new google.elements.NewsShow(content, options);
 }

 google.setOnLoadCallback(onLoad);
</script>
  </head>
  <body style="font-family: Arial;border: 0 none; background-color: #EAF3FF">
    <div id="content"></div>
  </body>
</html>
Save this code into a file named GoogleNews.html and place it into "C:Program Files\Microsoft Dynamics CRM\CRMWeb\ISV\News" the ISV folder of your CRM 4.0 on premise install. By default, a 'News' folder does not exist so please create one.
Next, go to Settings->Customizations->Customize Entities->Account->Form and add an Iframe onto the page. Give it the name and settings as shown below.

Publish the changes to Account and you should begin to see news items stream on Account pages.
Unfortunately during my testing I found some flaws in this approach for pulling in news, namely:
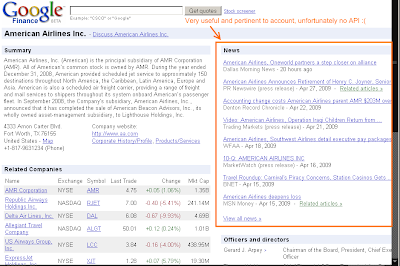
- The news results sometimes displayed information unrelated to the Account. An Account named "American Airlines" would return results with both "American" and "Airlines" which does not necessarily relate the Account name.
- News results are limited to 8 stories
- News would sometimes show up in foreign languages, even with the parameter set for only US stories.

The Google News widget definitely has potential but for now it is not ready for production environments.
On a related note, I noticed that the Google Finance pages tend to to use some other algorithm to determine the relevancy of an article to a company and as a result have more accurate articles. Now if there was some way to pull in the news stream from the Google Finance pages, I'd be the first one to sign up.
Warning: This customization is unsupported by Microsoft. Make sure you back up your files in case any undesired affects happen. Research any unsupported changes and test them on your development environment before making any changes to production!
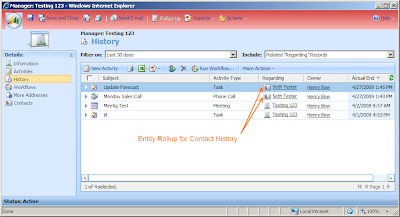
One of the limitations of custom entities created in CRM 4.0 is the inability to perform an entity rollup to show all of a custom entity's activities and the activities of its child entities. A working example of this rollup behavior is exhibited when you look at the Activity or History page for an Account entry. You will see all the Activities for the Account's child record as well as all the Activites for the Account's Contacts(its child entity).
To overcome this limitation, I did some research on how the Activity and History pages for Accounts generate the rollup. I fired up SQL Server Profiler to intercept any queries made to the SQL Server database while I loaded an Account's Activity page within Internet Explorer. The profiler showed that the stored procedure p_RollupByAccount performed all the heavy lifting. The p_RollupByAccount creates a temporary table called #RollupIds which stores all the GUIDs for the Account and its child Contacts and then a subsequent query pulls in all the activities for GUIDs in this table.
Next, I created a custom entity called Manager (cc1_manager) and created a 1:N relationship to Contact (cc1_manager_to_contact) as shown below. Note that the Relationship Attribute is titled cc1_parentmanagerid, which we will use later.

Open up the p_RollupByAccount stored procedure and create a backup as we'll be making some changes. The original code has this section at the beginning of the stored procedure to find the currently opened Account, its sub Accounts and their Contacts.
declare @Level int
set @Level = 1
while (@@ROWCOUNT != 0 and @Level <= 5)
BEGIN
 set @Level = @Level + 1
 insert into #RollupIds (RollupId)
 (
  select distinct AccountId
  from AccountBase acc (NOLOCK)
  join #RollupIds ri on
  (
   acc.ParentAccountId = ri.RollupId
  )
  where acc.AccountId not in
  (
   select RollupId from #RollupIds
  )
 )
END

insert into #RollupIds (RollupId)
(
 select distinct ContactId
 from ContactBase (NOLOCK)
 where AccountId = @AccountId
)
We replace the section above with our modified code below. The code starts by checking to see if the @AccountId GUID passed in is in the cc1_managerBase table. If it is, we'll know it's a Manager GUID and look for Contacts that have a cc1_parentmanagerid set to the Manager GUID. If the GUID passed in is in the AccountBase table, we'll know it is an Account and process it using the original code.
declare @Level int
set @Level = 1
-- ModifiedSQL: Conditional logic to check if passed in @AccountId guid is the guid of a Manager
IF exists  (SELECT cc1_managerId FROM cc1_managerBase WHERE cc1_managerId = @AccountId)
Begin
 -- ModifiedSQL: custom code to add managerID to the Rollup table
 --              @Level has been removed as we have not set a Manager to Manager relationship to establish a Manager/Sub Manager hierarchy
 while (@@ROWCOUNT != 0)
 BEGIN
  insert into #RollupIds (RollupId)
  (
   select distinct cc1_managerId
   from cc1_managerBase acc (NOLOCK)  -- ModifiedSQL: look in custom entity table cc1_managerBase
   where acc.cc1_managerId not in
   (
    select RollupId from #RollupIds
   )
  )
 END
 insert into #RollupIds(RollupId)
 (
  select distinct c.ContactId
  from ContactBase as c (NOLOCK)
  join dbo.ContactExtensionBase as ceb (NOLOCK)ON c.ContactId = ceb.ContactId
  join #RollupIds ri on
  (
   ceb.cc1_parentmanagerid = ri.RollupId
  )
  where
   not exists(
    select RollupId from #RollupIds where c.ContactId = RollupId
   )
 )
End
-- ModifiedSQL: Conditional logic to check if passed in @AccountId guid is the guid of an Account
If exists  (SELECT AccountID FROM AccountBase WHERE AccountID = @AccountId)
Begin
 -- original code for account
 while (@@ROWCOUNT != 0 and @Level <= 5)
 BEGIN
  set @Level = @Level + 1
  insert into #RollupIds (RollupId)
  (
   select distinct AccountId
   from AccountBase acc (NOLOCK)
   join #RollupIds ri on
   (
    acc.ParentAccountId = ri.RollupId
   )
   where acc.AccountId not in
   (
    select RollupId from #RollupIds
   )
  )
 END
 insert into #RollupIds (RollupId)
 (
  select distinct ContactId
  from ContactBase (NOLOCK)
  where AccountId = @AccountId
 )
End
Now that we have the database half completed, we'll move onto the modifications to the UI. By design, Custom Entities call a different aspx page to pull up all the Activitiy and History items. Whereas Accounts call the page "/sfa/accts/areas.aspx" Custom Entities call "userdefined/areas.aspx" Unfortunately the page used by Custom Entities does not use a stored procedure to generate the entity rollup list, since entity rollups are not a feature of custom entities. This is the reason why I've chosen to use the p_RollupByAccount stored procedure and repuropose "/sfa/accts/areas.aspx" to work for both Accounts and our Custom Entity Managers.
Navigate to the Customizations->Manager->Form->Form Properties->OnLoad Edit page to switch out the old "userdefined/areas.aspx" activity and history page with "/sfa/accts/areas.aspx" The javascript code below locates the "Activity" and "History" elements on the DOM of the page and replaces their onclick behaviour to open up "/sfa/accts/areas.aspx" instead. Since "/sfa/accts/areas.aspx" calls p_RollupByAccount by feeding in the GUID of the currently open object(be it an Account or a Manager), it'll grab the list of activity or history items just as we planned.
var navActivities;
var navActivityHistory;
navActivities = document.all.navActivities;
navActivityHistory = document.all.navActivityHistory;
if (navActivities != null)
{ navActivities.onclick = function() { loadArea('areaActivities');
document.all.areaActivitiesFrame.src="/sfa/accts/areas.aspx?oId=" + crmForm.ObjectId + "&oType=1&security=852023&tabSet=areaActivities";
};}
else
{
alert("navActivities Not Found");
}
if (navActivityHistory != null)
{ navActivityHistory.onclick = function() { loadArea('areaActivityHistory');
document.all.areaActivityHistoryFrame.src="/sfa/accts/areas.aspx?oId=" + crmForm.ObjectId + "&oType=1&security=852023&tabSet=areaActivityHistory";
};}
else
{
alert("navHistory Not Found");
}
Publish the changes to the Manager entity and you now have the ability to have activity entity rollups for custom entities. Use it wisely!

Dialing phone numbers by manually entering in numbers feels like an anachronism in this day and age. Fortunately for those office equiped with Cisco IP Phones, we can help make this practice a thing of the past. By creating a custom dial ActionButton and using javascript to create an HTTPS request to our Cisco Unified Communications Manager server, we can bake click to dial functionality for phone numbers, right into Dynamics CRM 4.0.
At work, we recently rolled out Cisco's Unified Personal Communicator(UPC) to much acclaim. UPC creates a sort of buddy list of your co-workers and allows you to quickly dial a colleague by simply double clicking on their name in the list. This is made possible with the tight integration between UPC and Cisco's IP Phones. I became enamored with the ease with which dialing co-workers had become and wanted to explore the possibility of adding this functionality to our own Dynamics CRM 4.0 system by leveraging existing resources.
After digging around on the Cisco site, I came across the Cisco Web Dialer, an API which allows click to dial functionality through HTTPS or SOAP requests. The Web Dialer functionality can be implemented by first enabling the feature in Cisco Unified Communications Manager. Then, simply use javascript to open a new window pointing to "https://server:port/webdialer/Webdialer?destination=" where 'server' and 'port' are the Communications Manager server and port and 'destination' is the phone number you want to dial. Be careful to HTML escape the phone number, in case any parenthesis or dashes are present. However, Web Dialer intelligently strips these characters out when the call is actually placed and should append the dial out code to your phone number.
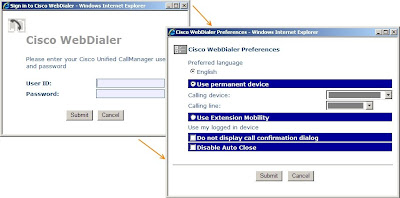
The first time you make a call using Web Dialer, it will present you with a login screen asking you to select a device to use to place the call. After these settings are in place, WebDialer generate a cookie for Internet Explorer. As long as the cookie is present, you won't be presented with these login screens, allowing you to initiate a call right after clicking the dial ActionButton.
The javascript code below creates an ActionButton which I detailed in a previous post. The code has been modified to add the WebDialer functionality. I've used the attribute telephone1 (Main Phone) for this example.
//
//Add Phone icon and enable click to dial using IP Phone
//
function loadjscssfile(filename, filetype){
 if (filetype=="js"){ //if filename is a external JavaScript file
  var fileref=document.createElement('script')
  fileref.setAttribute("type","text/javascript")
  fileref.setAttribute("src", filename)
 }
 else if (filetype=="css"){ //if filename is an external CSS file
  var fileref=document.createElement("link")
  fileref.setAttribute("rel", "stylesheet")
  fileref.setAttribute("type", "text/css")
  fileref.setAttribute("href", filename)
 }
 if (typeof fileref!="undefined")
  document.getElementsByTagName("head")[0].appendChild(fileref)
}
//load some styles to display link image and hovering link image
loadjscssfile("http://" + location.host + "/ISV/styles/ipphone.css", "css")

var phoneTD = document.getElementById('telephone1_d'); //get td element
var callIMG = document.createElement("img");
var callA = document.createElement("a");

//create img overlay to show "Dial number using Cisco Phone" when icon is hovered and store javascript to open link
callIMG.style.width = "22px";
callIMG.style.height = "19px";
callIMG.setAttribute("title", "Dial number using Cisco Phone");
callIMG.setAttribute("alt", "Dial number using Cisco Phone");
callIMG.setAttribute("src", "http://" + location.host + "/ISV/styles/blank.gif");
callIMG.onclick = function() {launchWebDialerServlet(crmForm.all.telephone1.value);return false;};
callIMG.style.visible = false;

//create dial ActionButton
callA.setAttribute("href", "#");
callA.style.position = "absolute";
callA.className = "dialNumber";
callA.style.right = "3px";
callA.style.top = "4px";
callA.appendChild(callIMG);

phoneTD.style.position = "relative";
phoneTD.appendChild(callA);

//specify dimensions for web dialer and open window
function launchWebDialerWindow( url ) {
    webdialer=window.open( url, "webdialer", "status=no, width=420, height=300, scrollbars=no, resizable=yes, toolbar=no" );
}
//call Web Dialer service, replace 'server' and 'port' with the server name of Cisco Communication Manager and appropriate port
function launchWebDialerServlet( destination ) {
    url = 'https://server:port/webdialer/Webdialer?destination=' + escape(destination);
    launchWebDialerWindow(url);
}
The images and files used in the sample can be found here: Download Zip
Make sure to put these files in "C:Program Files\Microsoft Dynamics CRM\CRMWeb\ISV\styles" the ISV folder of your CRM 4.0 on premise install. By default, a 'styles' folder does not exist so please create one.
Adding click to dial functionality within CRM 4.0 is a relatively painless procedure and your users and customers should find the dialing functionality infinitely useful.
Update 06/05/09: A kind reader pointed out some errors in my example code including an extra set of "../" in the ISV folder path and a missing call to launchWebDialerWindow. The ISV path has been switched to use location.host rather than the "../" convention for consistency. Code has been corrected.

One disadvantage of using Internet Explorer as a browser as opposed to say Firefox is the absence of a built in client side spell checker. With CRM 4.0 working exclusively with Internet Explorer, spell checking becomes more than just a convenience but a necessity since Activities entered into the CRM are viewable by co-workers throughout your organization. One creative spell checking solution which utilizes Microsoft Office's spell checking capabilities through an ActiveX control is outlined on CRM MVP Jim Wang's blog. However, this solution requires some relaxation of ActiveX control security within IE in addition to unsupported modifications to the edit.aspx page on your CRM server. An alternative is to install the free lightweight IE addon, IE7Pro. IE7Pro is not affiliated with Microsoft but is built and maintained by Innoshock, a small group of independent developers.
Much like Firefox, IE7Pro generates revenue by creating a Google search bar and generating search referral traffic. This allows Firefox and IE7Pro to operate advertisement free since Google pays them for any link ads you click through your searches. As a result, you the end user get a great suite of add-ons for Internet Explorer. Using the IE7Pro search bar is optional and can be turned off within the settings. You'll want to configure IE7Pro as shown in the screen shot below, since in this post we are only interested in the spell checking feature.

Some of the pros and cons to using IE7Pro over Jim Wang's Microsoft Office solution are outlined here:
Pros for using IE7Pro: - Spell check as you type
- Fully functional and free of charge
- No chance of breaking in future CRM update rollups and upgrades
- Does not use ActiveX, so no need to relax ActiveX security settings in IE
- Non technical, no coding required, easy button click install
- Spell checking not limited to just CRM 4.0
Cons for using IE7Pro: - No suggestion list for incorrectly spelled words
- Must individually install/maintain on user computers
- Might not catch all spelling errors(missed my errors with text and numbers e.g. "gr8")
I've found IE7Pro to be great at what it does, simple IE spell checking and your CRM 4.0 users should too!
Out of the box, Dynamics CRM 4.0 lets you send a link to CRM activity records by clicking Actions->Send Shortcut from the top toolbar. This forces users to open up the link in order to view the contents of an Activity. When an email chain regarding the linked Activity starts to form, it can become a hassle to open up the Activity each time to see the message body. The following javscript code and addition to the isv.config file will simplify matters by giving users an 'Email' button to email the text of the activity.
Start off by exporting your isv.config file. Open up the customizations.xml file and locate the "<Entity name="task">" section. Paste the following code between the "Entity" tags for Task. If the Entity Task tag doesn't exist, copy and paste the whole section of xml below. <Entity name="task">
<ToolBar ValidForCreate="0" ValidForUpdate="1">
<Button Client="Web, Outlook" Icon="../../../ISV/styles/outlookSmall.gif" JavaScript="createOutlookEmail(); " PassParams="1" WinMode="0">
<Titles>
<Title LCID="1033" Text=" Email " />
</Titles>
<ToolTips>
<ToolTip LCID="1033" Text="Email Activity using Outlook" />
</ToolTips>
</Button>
</ToolBar>
</Entity>
Download the Outlook icon we use for the button from the file here: Download Zip. You will want to place this Outlook icon inside the "C:\Program Files\Microsoft Dynamics CRM\CRMWeb\ISV\styles" of your CRM 4.0 server. A "styles" directory may not yet exist so please create one and then drop the smallOutlook.gif file in.
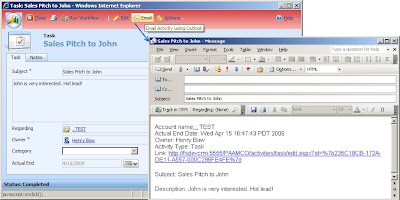
Next, we'll customize the Task entity by adding the javascript below to its Form Properties->OnLoad event. The following code uses the Outlook.Application ActiveX control, which provides a mechanism for Internet Explorer to access Outlook APIs. You will notice a FetchXml query in the code, this is used to find a Contact's Account name when the Regarding field of an activity has been set to a Contact. Feel free to change or modify the body of the Email message. I chose to include the Account name, Actual end date, Owner, Activity type, link to activity, Activity subject and Activity description fields but you may find other fields more useful.
//
// export activity to Outlook Email, activated by button in toolbar
//
createOutlookEmail = function() {
var linkLocation = location.href; //link to activity
var emailBody = ''; //contents of body of email
//ActiveX calls to open new Outlook email template
var outlookApp = new ActiveXObject('Outlook.Application');
var nameSpace = outlookApp.getNameSpace('MAPI');
var mailFolder = nameSpace.getDefaultFolder(6);
var mailItem = mailFolder.Items.add('IPM.Note.FormA');
if (crmForm.all.regardingobjectid.DataValue) {
//regarding is set to an account
if (crmForm.all.regardingobjectid.DataValue[0].type == 1) {
emailBody = 'Account name: '
+ crmForm.all.regardingobjectid.DataValue[0].name;
}
//regarding is set to a contact
else if (crmForm.all.regardingobjectid.DataValue[0].type == 2) {
//write fetchxml statement to query for contact's parent account name
var fetchQuery = '<fetch version="1.0" output-format="xml-platform" mapping="logical" distinct="true" page="1" count="1"><entity name="contact"><attribute name="contactid"/><filter type="and"><condition attribute="contactid" operator="eq" uitype="contact" value="'
+ crmForm.all.regardingobjectid.DataValue[0].id
+ '"/></filter><link-entity name="account" from="accountid" to="parentcustomerid" visible="false" link-type="outer" alias="contactparentcustomeridaccountaccountid"><attribute name="name"/></link-entity></entity></fetch>';
//package fetchxml in xml statement
var xmlQuery = '<?xml version="1.0" encoding="utf-8"?>'
+ '<soap:Envelope xmlns:soap="http://schemas.xmlsoap.org/soap/envelope/" xmlns:xsi="http://www.w3.org/2001/XMLSchema-instance" xmlns:xsd="http://www.w3.org/2001/XMLSchema">'
+ GenerateAuthenticationHeader()
+ ' <soap:Body>'
+ '<Fetch xmlns="http://schemas.microsoft.com/crm/2007/WebServices">'
+ '<fetchXml>' + _HtmlEncode(fetchQuery) + '</fetchXml>'
+ '</Fetch></soap:Body></soap:Envelope>';
//package xml into ajax soap request
var xmlHttpRequest = new ActiveXObject("Msxml2.XMLHTTP");
xmlHttpRequest.Open("POST", "/mscrmservices/2007/CrmService.asmx", false);
xmlHttpRequest.setRequestHeader("SOAPAction", "http://schemas.microsoft.com/crm/2007/WebServices/Fetch");
xmlHttpRequest.setRequestHeader("Content-Type", "text/xml; charset=utf-8");
xmlHttpRequest.setRequestHeader("Content-Length", xmlQuery.length);
xmlHttpRequest.send(xmlQuery);
//format xml response to replace esacaped characters
var resultXml = xmlHttpRequest.responseXML.xmlQuery.toString();
resultXml = resultXml.replace(/</g, "<");
resultXml = resultXml.replace(/>/g, ">");
resultXml = resultXml.replace(/&/g, "&");
//load xml response into xml parser
var xmlDoc = new ActiveXObject("Microsoft.XMLDOM");
xmlDoc.async = "false";
xmlDoc.loadXML(resultXml);
//parse xml response to find account name node and add to emailBody
var entityNodes = xmlDoc.selectNodes("//FetchResult/resultset/result");
var descriptionNode = '';
for (var i = 0; i < entityNodes.length; i++) {
var entityNode = entityNodes[i];
descriptionNode = entityNode
.selectSingleNode("contactparentcustomeridaccountaccountid.name");
emailBody = 'Account name: ';
}
//add contact name to emailBody
emailBody += descriptionNode.text + '\nContact name: '
+ crmForm.all.regardingobjectid.DataValue[0].name;
}
emailBody = emailBody + '\n';
}
//escape '{' and '}' symbols in link to activity
linkLocation = linkLocation.replace(/{/g, '%7b');
linkLocation = linkLocation.replace(/}/g, '%7d');
//set subject of Outlook email message
mailItem.Subject = crmForm.all.subject.value;
//set body of Outlook email message
mailItem.Body = emailBody
+ 'Actual End Date: '
+ crmForm.all.actualend.DataValue
+ '\nOwner: '
+ crmForm.all.ownerid.DataValue[0].name
+ '\nActivity Type: Task\nLink: '
+ linkLocation
+ '\n\nSubject: '
+ crmForm.all.subject.value
+ '\n\nDescription: '
+ (crmForm.all.description.DataValue == null
? ''
: crmForm.all.description.DataValue);
//show final Outlook email on user's screen
mailItem.display(0);
}
The final step is to enable ActiveX controls to run within your intranet. By default Internet Explorer is configured to block ActiveX controls as they can allow malicious virus writers to potentially take over your desktop. However, since our instance of Dynamics CRM 4.0 is on premise, we can safely choose to enable ActiveX controls on our local intranet. Follow the steps below to enable the setting for "Initialize and script ActiveX controls not marked safe for scripting." Make sure to select the Local Intranet icon in step 1, otherwise you may make your computer vulnerable to ActiveX script attacks. If you have a large organization, it may be helpful to script out the change in one blast. 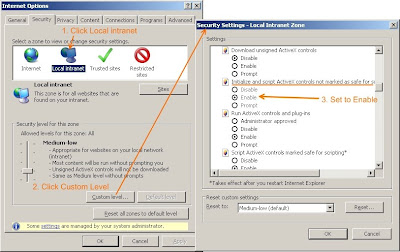
In the above example I used the Task entity. If you want the Email button to appear for other Activity entities, you will need to add the javascript above to the Form Properties->OnLoad event of the other entities as well. In addition, you must also copy the xml code above and paste it into the other "<Entity></Entity>" sections for the other Activity types.
 When you create a custom entity, CRM provides you with a generic gear icon to represent your entity. To make your entities easily distinguishable from one another you have to supply your own icons. Icon design is not my forte, so I've come to use the icon sets from http://www.famfamfam.com/ Famfamfam has produced thousands of icons for everyday use and has kindly released them into the public domain, giving free reign for everyone to use. You may even notice that many of these icons are actively used by other web sites you've come across. When you create a custom entity, CRM provides you with a generic gear icon to represent your entity. To make your entities easily distinguishable from one another you have to supply your own icons. Icon design is not my forte, so I've come to use the icon sets from http://www.famfamfam.com/ Famfamfam has produced thousands of icons for everyday use and has kindly released them into the public domain, giving free reign for everyone to use. You may even notice that many of these icons are actively used by other web sites you've come across.
Now that you have your icons, how do you give them the shadow and polish that the default icons have? Well, Microsoft has released a Dynamics CRM Demonstration Tools package that includes, among other things, an icon publisher.
The Demonstration Tools only accepts *.gif images so, you will need to convert the Famfamfam set *.png icons to *.gif using Paint.Net or a similar program. After converting your icons, open the Icon Maker tab within Demostration Tools and click the "Select Image..." button to load your images. You can use the same 16x16 pixel icon provided by Famfamfam for all three of the CRM icons, just make sure to click the "Use for all icons" and "Add Background" checkboxes.
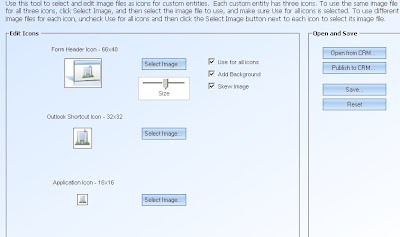
When you are happy with the icons, click the "Publish to CRM..." button, select your custom entity from the dropdown and your good to go. Clear your browser cache and your shiny new icons will give some spark to your custom entities.

One of the default fields of the CRM Account is websiteurl, which allows you to enter an Account's URL and make it clickable. Unfortunately, if you create additional custom attributes that store URLs, CRM 4.0 doesn't change them into a clickable links, forcing the user to copy and paste the link into a new window.
Originally, I tried using javascript to make a custom URL field, named 'cc1_website,' change to underlined blue text. Upon clicking the field, a new window would open up with the link. However, this got confusing when the user tried to click the text to modify the link. Should I have the javascript instead only trigger on a double click of the link and allow a single click to make the blue text change back to editable black? Realizing, this would be non-intuitive, I drew inspiration from the magnifying glass icon that CRM uses for lookup fields to create my own version for opening links.

To create your own clickable URL link, start off by navigating to settings->customize entities and open the entity you want to modify. Create a custom attribute named 'cc1_website' or something similar. Modify the form of the entity to add this field. In the Form Properties->OnLoad event, paste the following javascript:
//replace 'cc1_website' with the name of your custom attribute
function loadjscssfile(filename, filetype){
  if (filetype=="js"){
    var fileref=document.createElement('script')
    fileref.setAttribute("type","text/javascript")
    fileref.setAttribute("src", filename)
  }
  else if (filetype=="css"){
    var fileref=document.createElement("link")
    fileref.setAttribute("rel", "stylesheet")
    fileref.setAttribute("type", "text/css")
    fileref.setAttribute("href", filename)
  }
  if (typeof fileref!="undefined")
    document.getElementsByTagName("head")[0].appendChild(fileref)
}
//load some styles to display link image and hovering link image
loadjscssfile("http://" + location.host + "/ISV/styles/openLink.css", "css")

var linkTD = document.getElementById('cc1_website_d');
var siteIMG = document.createElement("img");
var siteA = document.createElement("a");

//create img overlay to show "Open Link" when icon is hovered and store javascript to open link
siteIMG.style.width = "22px";
siteIMG.style.height = "19px";
siteIMG.setAttribute("title", "Open Link");
siteIMG.setAttribute("alt", "Open Link");
siteIMG.setAttribute("src", "http://" + location.host + "/ISV/styles/blank.gif");  //1x1 pixel blank overlay image
siteIMG.onclick = function() {
                    var linkURL = document.getElementById('cc1_website').value;
                    if(linkURL)
                       window.open(linkURL.indexOf('http://')>-1?linkURL:'http://'+linkURL);
                    return false;};
siteIMG.style.visible = false;

//create img
siteA.setAttribute("href", "#");
siteA.style.position = "absolute";
siteA.className = "openLink";
siteA.style.right = "2px";
siteA.style.top = "4px";
siteA.appendChild(siteIMG);

linkTD.style.position = "relative";
linkTD.appendChild(siteA);
The images and files used in the sample can be found here: Download ZipMake sure to put these files in "C:Program Files\Microsoft Dynamics CRM\CRMWeb\ISV\styles" the ISV folder of your CRM 4.0 on premise install. By default, a 'styles' folder does not exist so please create one.
If you don't like the green arrow button image, feel free to create your own but make sure it has a height of 22px and a width of 19px. You'll also want to create a copy with an orange background that shows up when a user hovers over the button.
This custom button is not simply limited to just opening web links. By passing the contents of the attribute field you can build a variety of useful features, some of which I will detail in future posts. Get creative!
UPDATE: I've added a new post that gives instructions on how to create a click to dial ActionButton for those of you using Cisco IP Phones. Read Post
UPDATE - 02/04/09: A kind reader Randall Smith emailed me to let me know there was a bug in my code that was preventing the images from being displayed. I found that the '"http://" + ' prefix was missing from the two "location.host" addresses. Code has been updated with the change. Thanks Randall!

Warning: This customization is unsupported by Microsoft. Make sure you back up your files in case any undesired affects happen. Research any unsupported changes and test them on your development environment before making any changes to production!
To create a more personalized experience for your company or to help you quickly distinguish between a development, staging, and production environment you can change the CRM title banner.
Begin by navigating to the "_imgs" folder on the server that hosts your on premise CRM deployment. This is usually located at "C:\Program Files\Microsoft Dynamics CRM\CRMWeb\_imgs" Backup and copy masthead.jpg, mast_back.gif, and form_tool_bar.gif to a temporary directory. Next, fire up your preferred image manipulation program such as Paint.Net or Photoshop and change the copied images as desired. For my development environment I've added a red hue to set it apart from the blue on the production CRM. When you are happy with your image changes, paste and overwrite the existing files in the "_imgs" directory. Make sure the images have the same security properties as the other files in the "_imgs" directory otherwise IIS may be blocked from accessing the files. Clear your browser cache and then refresh your CRM page and your new customized headers should now be in place.
If you want the same effect shown in the sample above, download the banner files I used: Download Zip
CRM 4.0 stores emails tracked from Outlook as HTML within the database. So, when you open up a tracked email activity within CRM, it looks exactly the same as it would in Outlook. Unfortunately this causes some problems when you try to query the CRM database for some custom SQL reporting services reports. Any queries that use the description column from the FilteredEmail or FilteredActivity views will come up as pure HTML, befuddling users when they open up a report.
The function below uses regular expressions to parse out the HTML tags that are an eyesore for your report users, leaving behind just the text of the email message.
Function RemoveHTML( strText )
strText = System.Text.RegularExpressions.Regex.Replace(strText, "\n", " ")
strText = System.Text.RegularExpressions.Regex.Replace(strText, "( )+", " ")
strText = System.Text.RegularExpressions.Regex.Replace(strText, "<( )*head([^>])*>","<head>", System.Text.RegularExpressions.RegexOptions.IgnoreCase)
strText = System.Text.RegularExpressions.Regex.Replace(strText, "(<( )*(/)( )*head( )*>)","", System.Text.RegularExpressions.RegexOptions.IgnoreCase)
strText = System.Text.RegularExpressions.Regex.Replace(strText, "(<head>).*()",string.Empty, System.Text.RegularExpressions.RegexOptions.IgnoreCase)
strText = System.Text.RegularExpressions.Regex.Replace(strText, "<( )*script([^>])*>","<script>", System.Text.RegularExpressions.RegexOptions.IgnoreCase)
strText = System.Text.RegularExpressions.Regex.Replace(strText, "(<( )*(/)( )*script( )*>)","</script>", System.Text.RegularExpressions.RegexOptions.IgnoreCase)
strText = System.Text.RegularExpressions.Regex.Replace(strText, "(<script>).*(</script>)",string.Empty, System.Text.RegularExpressions.RegexOptions.IgnoreCase)
strText = System.Text.RegularExpressions.Regex.Replace(strText, "<( )*style([^>])*>","<style>", System.Text.RegularExpressions.RegexOptions.IgnoreCase)
strText = System.Text.RegularExpressions.Regex.Replace(strText, "(<( )*(/)( )*style( )*>)","</style>", System.Text.RegularExpressions.RegexOptions.IgnoreCase)
strText = System.Text.RegularExpressions.Regex.Replace(strText, "(<style>).*(</style>)",string.Empty, System.Text.RegularExpressions.RegexOptions.IgnoreCase)
strText = System.Text.RegularExpressions.Regex.Replace(strText, "<( )*br( )*>",vbCrLf, System.Text.RegularExpressions.RegexOptions.IgnoreCase)
strText = System.Text.RegularExpressions.Regex.Replace(strText, "<( )*li( )*>",vbCrLf, System.Text.RegularExpressions.RegexOptions.IgnoreCase)
strText = System.Text.RegularExpressions.Regex.Replace(strText, "<( )*div([^>])*>",vbCrLf, System.Text.RegularExpressions.RegexOptions.IgnoreCase)
strText = System.Text.RegularExpressions.Regex.Replace(strText, "<( )*tr([^>])*>",vbCrLf, System.Text.RegularExpressions.RegexOptions.IgnoreCase)
strText = System.Text.RegularExpressions.Regex.Replace(strText, "<( )*p([^>])*>",vbCrLf, System.Text.RegularExpressions.RegexOptions.IgnoreCase)
strText = System.Text.RegularExpressions.Regex.Replace(strText, "<[^>]*>",string.Empty, System.Text.RegularExpressions.RegexOptions.IgnoreCase)
strText = System.Text.RegularExpressions.Regex.Replace(strText, " "," ", System.Text.RegularExpressions.RegexOptions.IgnoreCase)
strText = System.Text.RegularExpressions.Regex.Replace(strText, "•"," * ", System.Text.RegularExpressions.RegexOptions.IgnoreCase)
strText = System.Text.RegularExpressions.Regex.Replace(strText, "<","<", System.Text.RegularExpressions.RegexOptions.IgnoreCase)
strText = System.Text.RegularExpressions.Regex.Replace(strText, ">",">", System.Text.RegularExpressions.RegexOptions.IgnoreCase)
strText = System.Text.RegularExpressions.Regex.Replace(strText, ""","""", System.Text.RegularExpressions.RegexOptions.IgnoreCase)
strText = System.Text.RegularExpressions.Regex.Replace(strText, "‹","<", System.Text.RegularExpressions.RegexOptions.IgnoreCase)
strText = System.Text.RegularExpressions.Regex.Replace(strText, "›",">", System.Text.RegularExpressions.RegexOptions.IgnoreCase)
strText = System.Text.RegularExpressions.Regex.Replace(strText, "™","(tm)", System.Text.RegularExpressions.RegexOptions.IgnoreCase)
strText = System.Text.RegularExpressions.Regex.Replace(strText, "⁄","/", System.Text.RegularExpressions.RegexOptions.IgnoreCase)
strText = System.Text.RegularExpressions.Regex.Replace(strText, "&","&", System.Text.RegularExpressions.RegexOptions.IgnoreCase)
strText = System.Text.RegularExpressions.Regex.Replace(strText, "–","–", System.Text.RegularExpressions.RegexOptions.IgnoreCase)
strText = System.Text.RegularExpressions.Regex.Replace(strText, "“","""", System.Text.RegularExpressions.RegexOptions.IgnoreCase)
strText = System.Text.RegularExpressions.Regex.Replace(strText, "”","""", System.Text.RegularExpressions.RegexOptions.IgnoreCase)
strText = System.Text.RegularExpressions.Regex.Replace(strText, "‘","'", System.Text.RegularExpressions.RegexOptions.IgnoreCase)
strText = System.Text.RegularExpressions.Regex.Replace(strText, "’","'", System.Text.RegularExpressions.RegexOptions.IgnoreCase)
RemoveHTML = strText
End Function
Navigate to the layout tab of your report and right-click the whitespace around the report to modify the properties. Place the code inside the Code tab of the Report Properties as shown below.
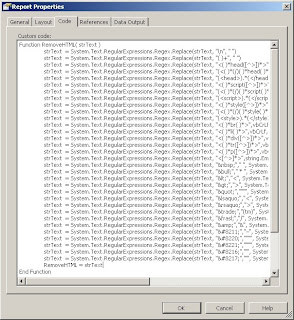
To call your function within the layout page of your report, use the expression "=code.RemoveHTML(Fields!Description.Value)" where Description is the name of the column that holds the HTML email message body.
Welcome! This blog will help traffic all my thoughts and work done on the Microsoft Dynamics CRM 4.0 platform. I've found the community to be infinitely useful in providing creative solutions to augment CRM 4.0 and plan to jot down some of the tips and tricks I've learned along the way.
Continue Entry»
|
About Me

Henry Bow
I'm a programmer living in sunny Orange Country, California. Since the beginning of 2008, I've been developing on the MS Dynamics CRM 4.0 platform. This blog will help me jot down some of the tips and neat features I've developed along the way while giving me a chance to dabble into the curious world of analytics and SEO. Please let me know if I can help with your CRM needs.
hbow27@gmail.com
Feed Rss
|


