Microsoft Dynamics CRM 4.0 - Thought Repository
Showing posts with label actionbutton. Show all posts

Friday, September 11, 2009

Shortcut to Email Contacts Using Outlook


While CRM 4.0 has a built in feature to email contacts, I've found it a bit less than intuitive for end users. When a user clicks the "Send Email" button in a Contact record, a new CRM form opens up giving them room to type in an email but also presents form fields for the CRM Email Activity. When the user types up the email and clicks send, if you haven't configured an email server for CRM, the email isn't actually sent off immediately. Rather, the user has to wait for their Outlook to sync with the CRM servers and send it out through their own inbox, which can cause some confusion. Some users would prefer to quickly shoot off a quick email using the familiar Outlook interface, without having to copy and paste the Contact's email address. By adding a custom ActionButton, this is a simple addition.

The javascript code below creates an ActionButton which I detailed in a previous post. The code has been modified to add the emailing functionality. I've used the attribute emailaddress1(Email) for this example.
//replace 'emailaddress1' with the name of your custom attribute, make sure you keep the '_d' ending
function loadjscssfile(filename, filetype){  
  if (filetype=="js"){  
    var fileref=document.createElement('script')  
    fileref.setAttribute("type","text/javascript")  
    fileref.setAttribute("src", filename)  
  }  
  else if (filetype=="css"){  
    var fileref=document.createElement("link")  
    fileref.setAttribute("rel", "stylesheet")  
    fileref.setAttribute("type", "text/css")  
    fileref.setAttribute("href", filename)  
  }  
  if (typeof fileref!="undefined")  
    document.getElementsByTagName("head")[0].appendChild(fileref)  
}  
//load some styles to display link image and hovering link image  
loadjscssfile("http://" + location.host + "/ISV/styles/openEmail.css", "css")  
  
var linkTD = document.getElementById("emailaddress1_d");  
var siteIMG = document.createElement("img");  
var siteA = document.createElement("a");

//create img overlay to show "Send Email to Contact" when icon is hovered and store javascript to open link  
siteIMG.style.width = "22px";  
siteIMG.style.height = "19px";  
siteIMG.setAttribute("title", "Send Email to Contact");  
siteIMG.setAttribute("alt", "Send Email to Contact");  
siteIMG.setAttribute("src", "http://" + location.host + "/ISV/styles/blank.gif");  //1x1 pixel blank overlay image  
siteIMG.style.visible = false;  

//create img  
siteA.setAttribute("href", "mailto:"+crmForm.all.emailaddress1.DataValue);  
siteA.style.position = "absolute";  
siteA.className = "openEmail";  
siteA.style.right = "2px";  
siteA.style.top = "4px";  
siteA.appendChild(siteIMG);  

linkTD.style.position = "relative";  
linkTD.appendChild(siteA);
The images and files used in the sample can be found here: Download Zip

Make sure to put these files in "C:Program Files\Microsoft Dynamics CRM\CRMWeb\ISV\styles" the ISV folder of your CRM 4.0 on premise install. By default, a 'styles' folder does not exist so please create one.
While this feature might seem trivial, every little bit helps in ensuring a great CRM experience!
Continue Entry»

View Comments

Monday, April 20, 2009

Click to Dial: Call Phone Numbers in CRM 4.0 using Cisco IP Phones

Dynamics CRM 4.0 Click to Dial using Cisco IP Phone
Dialing phone numbers by manually entering in numbers feels like an anachronism in this day and age. Fortunately for those office equiped with Cisco IP Phones, we can help make this practice a thing of the past. By creating a custom dial ActionButton and using javascript to create an HTTPS request to our Cisco Unified Communications Manager server, we can bake click to dial functionality for phone numbers, right into Dynamics CRM 4.0.


At work, we recently rolled out Cisco's Unified Personal Communicator(UPC) to much acclaim. UPC creates a sort of buddy list of your co-workers and allows you to quickly dial a colleague by simply double clicking on their name in the list. This is made possible with the tight integration between UPC and Cisco's IP Phones. I became enamored with the ease with which dialing co-workers had become and wanted to explore the possibility of adding this functionality to our own Dynamics CRM 4.0 system by leveraging existing resources.
After digging around on the Cisco site, I came across the Cisco Web Dialer, an API which allows click to dial functionality through HTTPS or SOAP requests. The Web Dialer functionality can be implemented by first enabling the feature in Cisco Unified Communications Manager. Then, simply use javascript to open a new window pointing to "https://server:port/webdialer/Webdialer?destination=" where 'server' and 'port' are the Communications Manager server and port and 'destination' is the phone number you want to dial. Be careful to HTML escape the phone number, in case any parenthesis or dashes are present. However, Web Dialer intelligently strips these characters out when the call is actually placed and should append the dial out code to your phone number.
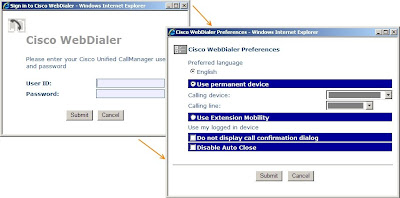
Cisco WebDialer login prompt
The first time you make a call using Web Dialer, it will present you with a login screen asking you to select a device to use to place the call. After these settings are in place, WebDialer generate a cookie for Internet Explorer. As long as the cookie is present, you won't be presented with these login screens, allowing you to initiate a call right after clicking the dial ActionButton.
The javascript code below creates an ActionButton which I detailed in a previous post. The code has been modified to add the WebDialer functionality. I've used the attribute telephone1 (Main Phone) for this example.
//
//Add Phone icon and enable click to dial using IP Phone
//
function loadjscssfile(filename, filetype){
 if (filetype=="js"){ //if filename is a external JavaScript file
  var fileref=document.createElement('script')
  fileref.setAttribute("type","text/javascript")
  fileref.setAttribute("src", filename)
 }
 else if (filetype=="css"){ //if filename is an external CSS file
  var fileref=document.createElement("link")
  fileref.setAttribute("rel", "stylesheet")
  fileref.setAttribute("type", "text/css")
  fileref.setAttribute("href", filename)
 }
 if (typeof fileref!="undefined")
  document.getElementsByTagName("head")[0].appendChild(fileref)
}
//load some styles to display link image and hovering link image
loadjscssfile("http://" + location.host + "/ISV/styles/ipphone.css", "css") 

var phoneTD = document.getElementById('telephone1_d'); //get td element
var callIMG = document.createElement("img");
var callA = document.createElement("a");

//create img overlay to show "Dial number using Cisco Phone" when icon is hovered and store javascript to open link   
callIMG.style.width = "22px";
callIMG.style.height = "19px";
callIMG.setAttribute("title", "Dial number using Cisco Phone");
callIMG.setAttribute("alt", "Dial number using Cisco Phone");
callIMG.setAttribute("src", "http://" + location.host + "/ISV/styles/blank.gif");
callIMG.onclick = function() {launchWebDialerServlet(crmForm.all.telephone1.value);return false;};
callIMG.style.visible = false;

//create dial ActionButton
callA.setAttribute("href", "#");
callA.style.position = "absolute";
callA.className = "dialNumber";
callA.style.right = "3px";
callA.style.top = "4px";
callA.appendChild(callIMG);

phoneTD.style.position = "relative";
phoneTD.appendChild(callA);

//specify dimensions for web dialer and open window
function launchWebDialerWindow( url ) {
    webdialer=window.open( url, "webdialer", "status=no, width=420, height=300, scrollbars=no, resizable=yes, toolbar=no" );
}
//call Web Dialer service, replace 'server' and 'port' with the server name of Cisco Communication Manager and appropriate port
function launchWebDialerServlet( destination ) {
    url = 'https://server:port/webdialer/Webdialer?destination=' + escape(destination);
    launchWebDialerWindow(url);
}

The images and files used in the sample can be found here: Download Zip
Make sure to put these files in "C:Program Files\Microsoft Dynamics CRM\CRMWeb\ISV\styles" the ISV folder of your CRM 4.0 on premise install. By default, a 'styles' folder does not exist so please create one.
Adding click to dial functionality within CRM 4.0 is a relatively painless procedure and your users and customers should find the dialing functionality infinitely useful.
Update 06/05/09: A kind reader pointed out some errors in my example code including an extra set of "../" in the ISV folder path and a missing call to launchWebDialerWindow. The ISV path has been switched to use location.host rather than the "../" convention for consistency. Code has been corrected.
Continue Entry»

View Comments

Tuesday, April 14, 2009

Create Custom ActionButton to Open Web Sites


One of the default fields of the CRM Account is websiteurl, which allows you to enter an Account's URL and make it clickable. Unfortunately, if you create additional custom attributes that store URLs, CRM 4.0 doesn't change them into a clickable links, forcing the user to copy and paste the link into a new window.


Originally, I tried using javascript to make a custom URL field, named 'cc1_website,' change to underlined blue text. Upon clicking the field, a new window would open up with the link. However, this got confusing when the user tried to click the text to modify the link. Should I have the javascript instead only trigger on a double click of the link and allow a single click to make the blue text change back to editable black? Realizing, this would be non-intuitive, I drew inspiration from the magnifying glass icon that CRM uses for lookup fields to create my own version for opening links.


To create your own clickable URL link, start off by navigating to settings->customize entities and open the entity you want to modify. Create a custom attribute named 'cc1_website' or something similar. Modify the form of the entity to add this field. In the Form Properties->OnLoad event, paste the following javascript:
//replace 'cc1_website' with the name of your custom attribute
function loadjscssfile(filename, filetype){
  if (filetype=="js"){
    var fileref=document.createElement('script')
    fileref.setAttribute("type","text/javascript")
    fileref.setAttribute("src", filename)
  }
  else if (filetype=="css"){
    var fileref=document.createElement("link")
    fileref.setAttribute("rel", "stylesheet")
    fileref.setAttribute("type", "text/css")
    fileref.setAttribute("href", filename)
  }
  if (typeof fileref!="undefined")
    document.getElementsByTagName("head")[0].appendChild(fileref)
}
//load some styles to display link image and hovering link image
loadjscssfile("http://" + location.host + "/ISV/styles/openLink.css", "css")

var linkTD = document.getElementById('cc1_website_d');
var siteIMG = document.createElement("img");
var siteA = document.createElement("a");

//create img overlay to show "Open Link" when icon is hovered and store javascript to open link
siteIMG.style.width = "22px";
siteIMG.style.height = "19px";
siteIMG.setAttribute("title", "Open Link");
siteIMG.setAttribute("alt", "Open Link");
siteIMG.setAttribute("src", "http://" + location.host + "/ISV/styles/blank.gif");  //1x1 pixel blank overlay image 
siteIMG.onclick = function() {
                    var linkURL = document.getElementById('cc1_website').value;
                    if(linkURL)
                       window.open(linkURL.indexOf('http://')>-1?linkURL:'http://'+linkURL);
                    return false;};
siteIMG.style.visible = false;

//create img
siteA.setAttribute("href", "#");
siteA.style.position = "absolute";
siteA.className = "openLink";
siteA.style.right = "2px";
siteA.style.top = "4px";
siteA.appendChild(siteIMG);

linkTD.style.position = "relative";
linkTD.appendChild(siteA);
The images and files used in the sample can be found here: Download Zip

Make sure to put these files in "C:Program Files\Microsoft Dynamics CRM\CRMWeb\ISV\styles" the ISV folder of your CRM 4.0 on premise install. By default, a 'styles' folder does not exist so please create one.

If you don't like the green arrow button image, feel free to create your own but make sure it has a height of 22px and a width of 19px. You'll also want to create a copy with an orange background that shows up when a user hovers over the button.

This custom button is not simply limited to just opening web links. By passing the contents of the attribute field you can build a variety of useful features, some of which I will detail in future posts. Get creative!

UPDATE: I've added a new post that gives instructions on how to create a click to dial ActionButton for those of you using Cisco IP Phones. Read Post

UPDATE - 02/04/09: A kind reader Randall Smith emailed me to let me know there was a bug in my code that was preventing the images from being displayed. I found that the '"http://" + ' prefix was missing from the two "location.host" addresses. Code has been updated with the change. Thanks Randall!
Continue Entry»

View Comments

About Me

Henry Bow
I'm a programmer living in sunny Orange Country, California. Since the beginning of 2008, I've been developing on the MS Dynamics CRM 4.0 platform. This blog will help me jot down some of the tips and neat features I've developed along the way while giving me a chance to dabble into the curious world of analytics and SEO.

Please let me know if I can help with your CRM needs.
hbow27@gmail.com

Feed Rss

Subscribe to new posts via e-mail

Recent Posts